Get common elements from multiple arrays in JavaScript

This is a JavaScript function to get common elements from indefinite number of arrays.


var intersectArrays = function(){
var min = 1000; var arg = 0; var index = 0;
var common = [];
for (var i=0; i<arguments.length; i++){
if(arguments[i].length < min){
min = arguments[i].length;
arg = i;
}
}
for (var i=0; i<arguments[arg].length; i++){
for (var j=0; j<arguments.length; j++){
if(j!=arg && arguments[j].indexOf(arguments[arg][i]) != -1){
index++;
}
}
if(index == arguments.length-1){
common.push(arguments[arg][i]);
}
index = 0;
}
return common;
};

view raw

intersectArrays

hosted with ❤ by GitHub

Input: Indefinite number of Arrays.

Output: Array consisting of common elements from given arrays.

To see how it works:
http://jsfiddle.net/shoobm/j6hjuh0t/
Simple JavaScript Countdown

There are many jQuery countdown plugins available, but I couldn’t find just the countdown function. So here it is, customize it the way you want 🙂

var countdown = function (callback, duration) {
   var container = $(this[0]);
   var countdown = setInterval(function () {
      if (--duration) {
        h=("0"+Math.floor(duration/3600)).slice(-2);
        m=("0"+Math.floor(duration/60)).slice(-2);
        s=("0"+duration%60).slice(-2);
        container.html(h+':'+m+':'+s);
      } else {
        clearInterval(countdown);
        callback.call(container);
      }
   }, 1000);
};

You can remove the hour (var h) or add a day counter with

d=("0"+Math.floor(duration/86400)).slice(-2);
...
container.html(d+':'+h+':'+m+':'+s);

You can style them by applying classes in this line
container.html(h+':'+m+':'+s);

Example on JSFiddle: http://jsfiddle.net/shoobm/erugvzub/

Have fun!

Sync WordPress and Woocommerce user profile

I never understood why woocommerce developers decided not to sync name and email address for billing and shipping to the wordpress user meta. Also, ‘The profile owner and the person who is placing the order may not be the same’ should not be considered as a feature. Retaining outdated contact details on the checkout page will also lead to user’s confusion and frustration.

So here’s the solution!

Following code snippet will update First Name, Last Name and Email address for billing and shipping contact details when any user updates his/her profile. Tested with WordPress 3.8 and Woocommerce 2.1.

Just append this code in ‘Functions.php’ file in your theme’s directory.

<?php
// Auto Update Woocommerce billing and shipping name,email on profile update
add_filter( 'profile_update' , 'custom_update_checkout_fields', 10, 2 );
function custom_update_checkout_fields($user_id, $old_user_data ) {
  $current_user = wp_get_current_user();

  // Updating Billing info
  if($current_user->user_firstname != $current_user->billing_first_name)
    update_user_meta($user_id, 'billing_first_name', $current_user->user_firstname);
  if($current_user->user_lastname != $current_user->billing_last_name)
    update_user_meta($user_id, 'billing_last_name', $current_user->user_lastname);
  if($current_user->user_email != $current_user->billing_email)
    update_user_meta($user_id, 'billing_email', $current_user->user_email);
 
  // Updating Shipping info
  if($current_user->user_firstname != $current_user->shipping_first_name)
    update_user_meta($user_id, 'shipping_first_name', $current_user->user_firstname);
  if($current_user->user_lastname != $current_user->shipping_last_name)
    update_user_meta($user_id, 'shipping_last_name', $current_user->user_lastname);
  if($current_user->user_email != $current_user->shipping_email)
    update_user_meta($user_id, 'shipping_email', $current_user->user_email);
}
?>

Recover Hidden Files From Flash Drives or External Hard Disks Due to Virus Infection

If the files and folders in your external hard disk or flash drive have turned into shortcuts or are hidden, here is one solution to recover your data. Operating system used – Windows 7.

  1. Install good antivirus and scan entire computer including the flash drive/external hard disk.
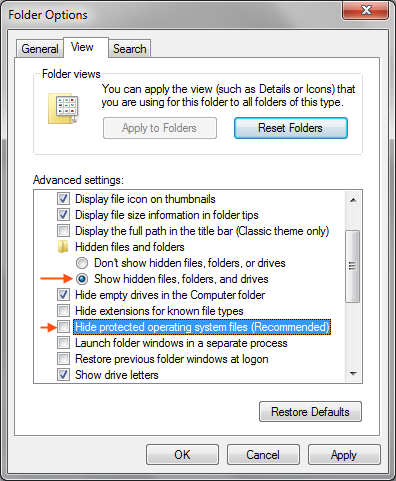
  2. Go to Control Panel, Folder Options, select VIEW tab, select “Show hidden files, folders and drives” and uncheck “Hide protected operating system files (recommended)” now click APPLY

    Folder Options
    Folder Options
  3. Open command prompt (press Win+R, type cmd, press enter), assuming ‘G:‘ as the letter of affected drive, enter this command-

    attrib -h -r -s /s /d g:\*.*

    replace ‘g:’ with other drive letter if needed.

You can check your flash drive/external hard disk, the data should be visible. You can restore the original folder options.

Installing rmagick gem on Windows 7

English: Logo for ImageMagick

I was trying to create a blog based on locomotivecms , but the ‘bundle install’ command failed to install the rmagick gem.

RMagick is an interface between the Ruby programming language and the ImageMagick® and GraphicsMagick image processing libraries.

So here is the solution.. worked for Windows 7 64bit, should also work for 32bit machines.

Prerequisites:
Ruby > 1.8.6
DevKit (any version)
No other ImageMagick installation or PATH entry

Step 1:
Installing ImageMagick:

Download ImageMagick:

http://imagemagick.spd.co.il/binaries/ImageMagick-6.8.0-3-Q16-windows-dll.exe

Install ImageMagick:
*Important: The installation path should NOT contain any spaces.

Ideally select “C:\ImageMagick″

Please make sure to select the below options:

Step 2:
Installing rmagick:

Use the following command to install rmagick gem:

gem install rmagick --version=2.12.2 --platform=ruby -- --with-opt-lib=c:/ImageMagick/lib --with-opt-include=c:/ImageMagick/include

i’m installing version 2.12.2 as it is needed by locmotive cms, if you skip the version parameter, 2.13.1 will be installed.

Happy Coding 🙂

credits – Food for Thought